
Every organization, big and small, has to deal with what happens when something goes wrong. From small companies with bespoke workflows all the way up to enterprises with ITSM processes and compliance, removing stress and creating predictability in incident management is key to getting back on course.
Incident management at Altis
At Altis, we provide managed WordPress hosting for a variety of customers, including enterprise customers for whom their environment is critically important. As part of providing this service, we monitor and respond to all manner of incidents, from downtime events to potential security breaches.
We’re constantly evaluating the best tools across the industry and improving our processes. Our key tool for managing incidents is Incident.io; it’s a fantastic tool for bringing the team together to collaborate when things catch on fire. We also use Zendesk to communicate with customers and partners working on the platform, bringing customer interaction into one place.
Our incident response process can be triggered in one of two ways:
- we are proactively alerted to an incident by our automated systems, or
- a customer reaches out to let us know something’s wrong.
Regardless of how an incident kicks off, we communicate with the customer through a Zendesk ticket.
Incident.io has great tools for the team working in a single Slack channel, which effectively acts like a “war room” for the incident. Where we can, we want to pull all of the communication and information into that room to keep it all together.
Recently, we added an integration to pull Zendesk ticket comments into the incident channel as well, helping us instantly see any communication from customers. We’re using Incident.io’s new REST API to pull data. To bind everything together, we use Zapier as the glue between Zendesk, Incident.io, and Slack.

Setting up your own incident management workflow
Setting this integration up requires a bit of manual work, but it’s worth it to bring everything together. In the heat of dealing with an incident, reducing cognitive load and manual work helps us focus on the things that matter most: fixing the incident.
Here’s how you can configure a similar incident management workflow for your own team:
1. Set up Incident.io
First, create a custom field in Incident.io for your Zendesk ticket ID. Call this whatever you’d like (eg “Zendesk ticket”), but make sure you set the type to Number.

Depending on your incident management process, you might also want to set this to “require on creation”.
Next, create an Incident.io API key in your organisation settings. You’ll need to grant the “View data, like public incidents and organisation settings” permission.
Note this API key down, as you’ll need it in later steps, and it won’t be shown again. It’ll look like inc_abcd1234 (but longer); we’ll use that as the example key in next steps.
2. Get the field ID from the API
You’ll need to get the ID for your custom field so we can pull this into Zapier later.
Currently, the only way to get this is through using Incident.io’s API directly. You can pull down your custom fields using the following call (remember to replace the API key here with yours):
curl -H 'Authorization: Bearer inc_abcd1234' https://api.incident.io/v1/custom_fieldsTake note of the ID corresponding to your ticket ID field; we’ll need this for the Zapier workflow later.
3. Create your Zapier workflow
Before proceeding any further, you’ll need to create your Zapier workflow. We’re going to use the webhook input, so this needs to be created first to give you a webhook URL.
Create a new Zapier workflow, using the Webhooks by Zapier app with the Catch Hook trigger. You don’t need any further settings, so jump straight to the Test Trigger after you’ve added it.

Here, you’ll now have your webhook URL. Copy it down. You can pause on any further steps in Zapier for now, but we’ll be back, so keep the tab open.
4. Connect Zendesk to Zapier
To connect Zendesk to Zapier, we’ll need two steps: creating a webhook in Zendesk, and then setting up a trigger to send comment data there.
First up, open your Zendesk settings, and head to Apps and integrations, then Webhooks. Create a new webhook, give it a descriptive name (like “Zapier – Incidents”), and insert your webhook URL from Zapier. Set your request method to POST, request format to JSON, and then save it. Make sure you also mark it as active.
Next, head to Objects and rules, then Triggers. Create a new trigger with a descriptive name (“Comments to Slack”), and set up your conditions; we recommend picking “Ticket is Updated”, and “Comment is Present (public or private)”.

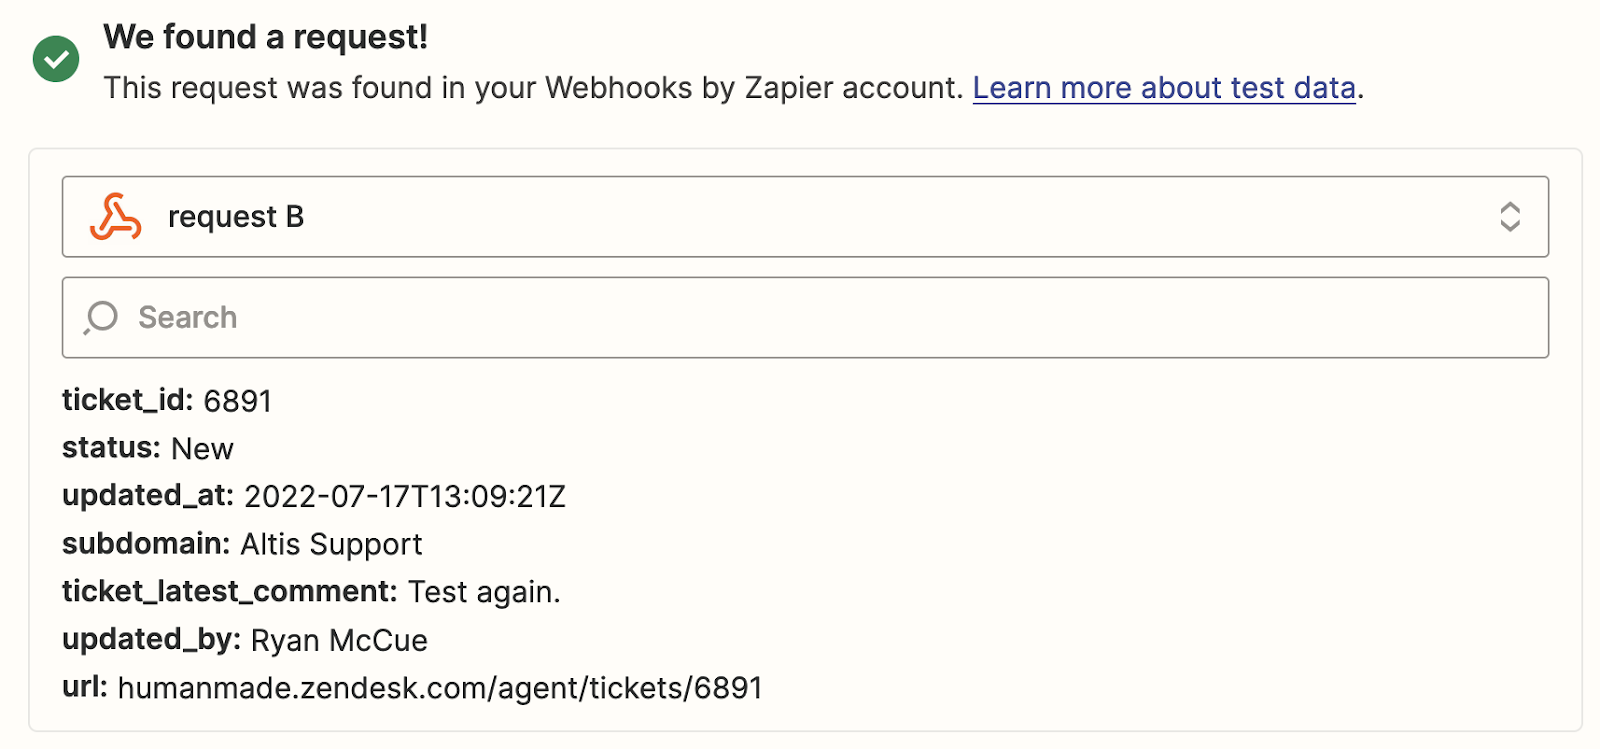
Then, add an Action to the trigger. Select “Notify active webhook” with the webhook you just created. You’ll need to manually write out your JSON format for all the data you want to display in your notifications. Here’s what we use:
{
    "ticket_id": "{{ticket.id}}",
    "status": "{{ticket.status}}",
    "updated_at": "{{ticket.updated_at_with_timestamp}}",
    "subdomain": "{{ticket.account}}",
    "ticket_latest_comment": "{{ticket.latest_comment}}",
    "updated_by": "{{current_user.name}}",
    "url": "{{ticket.url}}"
}
With all that done, go ahead and save it.
5. Create some test data
In order to send some example data to your Zapier webhook, you’ll also need a test ticket. Create a test ticket, and leave at least one comment on the ticket to ensure your trigger fires at least once.
You’ll also need to declare an incident in Incident.io. Unfortunately, this needs to be a live incident rather than a test incident as the API only returns live incidents; you can convert it to a test incident after you’ve got everything set up to avoid messing with your stats.
Make sure you set the ticket field on your test incident to the test ticket you created.
6. Back to Zapier
Head back to your Zap in Zapier. In the trigger, load in the data from your webhook, and you should see the data sent in from Zendesk.
If you don’t see this data, check that your Zendesk triggers are set up correctly.
Now it’s time to add the core engine that pulls everything together: a JavaScript action. Add the “Code by Zapier” action, then select the “Run Javascript” event. In set up action, first add three Input Data items:
- ticketId: Select the Ticket ID field from your trigger data.
- apiKey: Add your Incident.io API key from step 1 above.
- ticketFieldId: Add your field ID for the Zendesk Ticket from Incident.io, from step 2 above.

Now, we’re going to set up our code. Copy the following code into the code field of your action:
// Pull the latest incidents from Incident.io.
const opt = {
  headers: {
    Authorization: `Bearer ${ inputData.apiKey }`,
  },
};
const res = await fetch( 'https://api.incident.io/v1/incidents', opt );
const data = await res.json();

// Filter to relevant incidents by ticket ID.
const matching = data.incidents.find( incident => {
  // Find the Zendesk ticket field.
  const field = incident.custom_field_entries.find( field => field.custom_field.id === inputData.ticketFieldId );
  if ( ! field ) {
    return false;
  }

  // Find any matching values.
  const value = field.values.find( value => parseInt( value.value_numeric, 10 ) === parseInt( inputData.ticketId, 10 ) );

  // Return true if there’s any value found.
  return !! value;
} );


// Return the matching incident.
output = matching;
Hit continue and then use Test & review. You should see your test incident pop up, and no others.
We’ll also need to ensure any events which don’t match up to an incident channel stop the workflow.
Add a Filter action, and under “Only continue if…”, select “2. Slack Channel ID”. For the conditional, scroll right to the bottom of the list and select “Exists”.

7. Finishing off by connecting to Slack
We’re almost done!
The final step is to add a Slack action after your JavaScript action. Select “Send Channel Message”. You’ll then need to connect it to your Slack account and workspace; make sure that this is the same workspace that Incident.io is connected to.
In the Channel field, select Custom, then from your Run Javascript in Code action, select “Slack Channel ID”.
For your message text, you can insert any fields you’d like to format your message. Here’s an example of the fields we use:

Note: For some reason, Zendesk’s URL field doesn’t have the protocol, so you’ll need to prefix it with https:// here.
Select the rest of your settings for the message too; we recommend setting Auto-Expand Links and Link Usernames and Channel Names to No, so that errant links or @-mentions in ticket comments don’t pollute your channel.
Finally, test your action, and you should see the Zendesk ticket comment appear in your Slack channel.
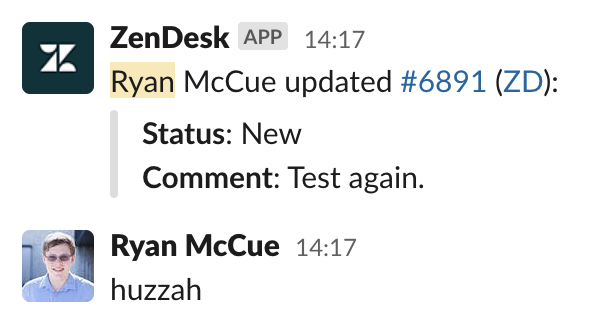
Huzzah indeed.
Future improvements
In the future, we’d love to be able to push ticket updates back to our incident timeline to assist with incident retros around communication. Incident.io’s API is pretty new, so it’s not possible to push data bidirectionally…yet.
Support for filtering by custom field value in the API would greatly simplify the custom code, and avoid any potential pagination issues. The API call currently has a limitation of 25 incidents; not a problem for us right now, but something larger organisations could run into if many incidents happen at once.
The team at Incident.io has been shipping features at a rapid pace, so keep an eye out for changes here. Also, if you’re not already using Incident.io for your incident management workflow, we strongly recommend it; it’s a great way to keep things organised and calm during otherwise-hectic events, plus the team behind it are fantastic.
To help out with visibility on the Zendesk side, we’d love to also pull the data across here. We’re already running a couple of custom Zendesk apps, so we might spin something up here in the future; that’ll need custom code though, and a great advantage of Zapier is the ability to quickly iterate and build on an idea without that.
We’re always looking for ways to iterate on our processes and improve our customer experience, and we’re looking forward to sharing more about our processes, so keep an eye on our blog for future posts.